Thursday, September 8, 2011

Best Ice Cream in the World?

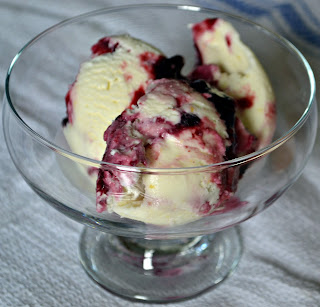
     Well, I've decided on a new career path if this whole medicine thing doesn't work out: I'm opening an ice cream shop. While my sis was visiting, we were lucky enough to sample some ice cream at Jeni's Ice Cream Shop in Columbus, OH. Not only is the ice cream amazing, they let you sample as many flavors as you want before you settle on one or two of them. While at most ice cream places I have no trouble narrowing it down to one or two flavors, this was not the case at Jeni's. How do you pick when you've never tried any of them? I ended up settling on blackberry and sweetcorn ice cream with cherry lambic sorbet, but not before trying 5 or so others, including lavender wild berry and goat cheese with cherries. The blackberry and sweetcorn was rich and creamy (you can taste the sweetcorn, but it's subtle and almost caramel-like) while the cherry lambic was bright and tart with an intense cherry flavor, so I think it made a perfect combo.
     Since I have the best sister in the world, she got me a copy of the cookbook written by the owner of Jeni's so I can make the stuff at home whenever I want to! The book is called Jeni's Splendid Ice Creams at Home and it has about 100 unique ice cream recipes, as well as recipes for sauces, sundaes and cookies to go with your creamy creations. It also has a useful section at the front that talks about ingredients and how to come up with your own recipes. Basically, Jeni Britton Bauer has my dream job- she comes up with crazy, delicious ice creams, writes cookbooks and runs several adorable ice cream shops for a living. I'm really trying not to be jealous.
     I decided to start with the sweetcorn and blackberry, in part because it was delicious, but also in part because everyone made a disgusted faces when I suggested sweetcorn ice cream... yes, it sounded like a challenge to me. It's also hard to get good sweetcorn and blackberries once summer ends (it's already getting more difficult!), so you have to make this one while the ingredients are available. And I didn't want to have to wait till next summer. I didn't change the recipe a lot, but did adjust the milk/ cream ratio based on what I had at home and used a combo of raspberries and blackberries in the sauce- the overall effect was very similar to what I ate in her shop. If you want the original, you can buy the book :-).

Sweetcorn and Black Raspberry Ice Cream (adapted from Jeni's Splendid Ice creams at Home)

Sweetcorn ice cream
-1 ear of corn, husked and silk removed
-1 2/3 c 2% milk
-1 2/3 c heavy cream
-1 Tb plus 1 tsp cornstarch
-1 1/2 oz cream cheese, softened
-1/4 tsp finely ground sea salt
-2/3 c sugar
-2 Tbs light corn syrup

-Cut the kernels off the ear of corn and use the knife to scrape off and remaining corn pieces and liquid. At this point, take a second to try the corn. If it isn't sweet, try a different ear or just make something different.
-Mix about 2 Tbs of milk with the cornstarch in a small bowl to make a "slurry."
-Whisk the cream cheese with the salt in a large bowl, set aside.
-Mix the cream, milk, sugar, corn syrup and corn in a 3 or 4 quart saucepan and place it over medium-high heat. If you use a 3 quart saucepan (as I did), watch it carefully so that it doesn't boil over- it can happen quite quickly- unfortunately, I know this by experience. Bring to a boil and allow it to boil for 4 min.
-Remove the mixture from heat and strain it. Push some of the solids through the strainer, leaving only the corn casts behind. Return to the original saucepan and whisk in the cornstarch mixture. Return to heat and bring back to a boil. Boil (stirring constantly) for about 1 minute, until the mixture thickens slightly.
-Remove from heat and whisk the cream mixture into the cream cheese and salt until smooth. Cover the bowl with plastic wrap (place it directly on the surface of the liquid) and place in the fridge for a couple hours until completely chilled.
-Pour the chilled mixture into the ice cream maker and run until the ice cream is thick and begins to pull away from the sides of the bowl.
-Layer the sweet corn ice cream and black raspberry sauce in a freezer-safe container (starting and ending with the sauce) and place wax paper or parchment paper against the surface of the ice cream. Place the container in the freezer and freeze for at least 4 hours.

Blackberry/ Raspberry Sauce
1 c raspberries (frozen or fresh)
1 c blackberries (frozen or fresh)
1 c sugar

-Place fruit and sugar in a small saucepan and bring to a simmer over medium heat. Simmer until the mixture reaches ~220 degrees (5-10 minutes), stirring occasionally.
-pour the mixture through a seive into a bowl to remove the seeds. Chill in the fridge for at least a couple hours before using. It will not freeze completely, but it will firm up a bit in the freezer when you add it to the ice cream

Monday, September 5, 2011

Cooking with my Favorite Sis!

    One of my favorite shows is Iron Chef, mostly because it's really interesting to see how the chefs use a surprise ingredient (I also like Chopped for this reason), but also because I sometimes get ideas for new dishes from it. This is one of the desserts that was inspired by a Cat Cora dish- she made a "fallen Napoleon" with a Semolina custard, amaretto cookies and figs poached with honey, lemon and cinnamon. Although this is not exactly what I made, I liked the idea of poaching figs with this mixture- almost caramelizing them and allowing them to soak up the flavors. Instead of the fallen Napoleon, I thought this would go well with a greek yogurt panna cotta, since honey and greek yogurt is one of my favorite snacks.
     I have been thinking about this dessert for at least a few weeks, but I waited to make it until my sister, Melissa, came to visit. She went abroad to Greece a couple of summers ago- so I knew that she would love this :-). I was lucky enough to get a visit from her last week, so here we are! This isn't the typical summer dessert (it may be a better dish to serve in the winter), but it would also be good with fresh blueberries and a drizzle of honey if you want something a little more season appropriate. Melissa also came up with the idea to cut the figs in half an arrange in a heart on the top- too cute!

Greek Yogurt Panna Cotta (adapted from Bon Appetit magazine)

-2 Tbs water
-2 Tbs fresh lemon juice
-2 1/2 tsps unflavored gelatin
-2 1/4 c plain whole-milk Greek yogurt
-1 3/4 c heavy whipping cream
-3/4 c sugar
-Canola oil

-Lightly coat the dish(es) you plan to use with canola oil. The recipe recommends a 9" round pan, but I used smaller, individual dishes. You can use whichever you want- just make sure you oil the sides well to allow for easy removal. They make special panna cotta molds- some of which are more fancy, with fluted designs, etc- but I just used some tapered ice cream dishes that I had at home. The most important thing is that the top is wider than the bottom. Otherwise, you won't be able to remove it without scooping it out and messing up the shape.
-Combine the water and lemon juice in a small bowl, mix in the gelatin and allow it to soften (takes about 15 minutes)
-Whisk the yogurt with 3/4 c of the cream in a large bowl.
-Place the remaining 1 c cream and sugar in a small saucepan and bring to a simmer over medium heat. Stir the cream mixture frequently until the sugar dissolves.
-Remove the pan from heat and whisk in the gelatin mixture until it's dissolved. Then, add this mixture to the yogurt and cream and whisk until well blended.
-Pour the mixture into the prepared dish(es) and place them in the fridge, uncovered, until it they are cool to the touch. Then, cover with plastic wrap and chill for at least 4 hours. We left them in overnight and they last in the fridge for quite a while (we ate the last one about a week after we'd made it).


After the honey-lemon mixture simmers for a while, the
lemons caramelize and the figs begin to plump up.
Poached Figs (improvised)
-1 c honey
-juice from 1 1/2 lemons
-2 small cinnamon sticks
-dried black figs (~15 will fit in mixture)


-Juice the lemons and discard seeds. Place two of the juiced lemon halves in a small saucepan, add lemon juice, honey and cinnamon sticks. Bring the mixture to a simmer and toss in the figs.
-Simmer the mixture until the figs begin to plump up and the sauce has reduced to a syrup (30 minutes to an hour).
-Allow to cool to room temperature before being poured over the panna cotta or it will melt the gelatin and create a greek yogurt puddle!
-I think next time I will peel the lemon zest in long strips and put it in the mixture instead of the lemon halves- the zest will caramelize as you cook the figs and can be used as a lovely garnish.
Melissa enjoying a cup of hot lemon juice and honey (to soothe
her sore throat) while we waited for the figs to be ready

Thursday, August 11, 2011

Adventures in Ice Cream Making

It looks delicious, but it's already starting to melt,
right out of the freezer!
    For those of you who don't know me well, ice cream is my favorite dessert... so as you might imagine, I was delighted to receive an ice cream maker as a wedding present. Because it generally requires specialized equipment, I've never made ice cream before, but I have to say, nothing you find in the store compares to homemade. And although it's actually pretty simple to make, it's a great thing to serve if you want to make something in advance that's sure to impress :-). Up to this point, I've just been experimenting, but so far, everything I've tried has been pretty hard to resist (especially for me)!
     Both of this recipes are adapted from Ina Garten's creations (Barefoot Contessa Family Style
and Barefoot Contessa Parties!cookbooks). I've started using more of her recipes lately, because she uses very simple ingredients and most of the recipes are easy to put together and are not particularly labor intensive. It's great to make something really decadent and elaborate from time to time, but it's even better to have some reliable recipes that don't require hours in the kitchen. In general, recipes that call for half and half or milk are icier and less creamy than those that have heavy cream (but are also less fattening!). Depending on the type of ice cream, one or the other may be appropriate. I've tried two recipes so far, one with half and half and one with cream. If you make a recipe with heavy cream, you don't even need an ice cream maker, you can just throw it in the freezer in a sealed container and stir once or twice per hour until it's frozen (I did this with 1/2 the batter because it didn't all fit in the ice cream maker and it was virtually indistinguishable). Unfortunately, our freezer isn't very cold, so all of the ice cream so far has been very soft and melty. It still tastes good, but you have to eat (or photograph) it quickly! 

    I think next I'll try something with fruit... maybe buttermilk and berries or a sorbet.... Any suggestions?!


Espresso Ice Cream


  • -3 cups half-and-half
  • -6 large egg yolks
  • -2/3 cup sugar
  • -1/4 tsp finely ground sea salt
  • -2 1/2 tablespoons finely ground espresso beans
  • -1 Tb coffee liquor (I used Kahlua)
  • -1 tsp vanilla

  • -4-6 ounces (2/3 cup) dark chocolate with almonds (Ina uses chocolate covered espresso beans)
  • -Beat the egg yolks, sugar and salt with a stand mixer paddle attachment (if you have one). Meanwhile, heat the half and half until bubbles begin to form around the edges (you should not let it boil).
  • -Slowly and carefully pour the half and half into the egg mixture, while the mixer continues to run. Mix until the ingredients are combined. 
  • -Pour the mixture back into the pan and cook over medium-low heat until the mixture thickens and coats the back of the spoon.
  • -Pour the mixture through a fine sieve, and then add espresso, vanilla and coffee liquor to the strained mixture. Cover the mixture with a sheet of plastic wrap (placed right on the surface of the mixture) to prevent a film from forming and chill well in the fridge.
  • -After the mixture has been chilled for a couple hours, I strained it again to remove some of the espresso bean  bits. Ina didn't do this, but I thought the ice cream would be too gritty if I hadn't. It's ok to leave some of the beans in- straining once is all that is necessary.
  • -Freeze the mixture in an ice cream machine, add the chopped chocolate bits and store in a sealed container in the fridge. Make sure that it freezes in the freezer for a couple hours before serving. For better or worse, this was gone before I could take a picture of it! 


Caramel Pecan Nut Ice Cream (pictured)


-1/2 c water
-2 1/2 c sugar
-6 c heavy cream
-2 Tbs vanilla
-3 c pecan halves, toasted and crumbled or chopped
-7-8 oz milk chocolate diced (I used Hershey's bars)


-To make the caramel ice cream base, place the water and sugar into a heavy saucepan. Cook sugar mixture over low heat until the sugar dissolves.
-Increase to high heat and boil until the mixture is a dark caramel color, about 3-5 minutes. DO NOT STIR! You may swirl the saucepan occasionally to make sure the sugar doesn't burn.
-Remove the saucepan from heat, and add the cream. At this stage, it will look like you screwed up- the old cream will cause the caramel to turn into an unmanageable, solid mess. I promise that when you put it back on the burner on low heat, the caramel will dissolve into the cream and all will be right in the world again. This should take about 5-7 minutes. Add the vanilla.
-Chop the toasted pecans and chocolate and place them in the freezer till you're ready for them.
-Chill the caramel/ cream mixture in the fridge till well cooled. I placed a piece of plastic wrap directly to the surface of the mixture to make sure that a film didn't form in the fridge. Chill for at least an hour- I kept it in the fridge overnight.
-Freeze the ice cream in an ice cream maker, add the nuts and chocolate and put it in the freezer in a sealed container until you're ready to use it. It's best to make it well enough in advance that it can freeze for a couple hours before serving. OR, if you don't have an ice cream maker, mix in the nuts and throw it in the freezer. Stir it 1-2 times per hour until it's well frozen.
-Below are some pictures of the ice cream base at varying stages of done-ness. Note that in the fourth picture, it looks like I've screwed up. Picture three was taken right before I removed the syrup from heat, to give you an idea about what color it should be.


Thursday, July 28, 2011

A taste of summer

    There are few things that I love as much as desserts made with fresh summer fruit... except for maybe making them :-). A couple of weekends ago, I picked up some peaches and they were spectacular! We cut them up and served them with whipped cream and raspberries, we made a cobbler (sadly, it was gone too quickly to take any pictures...) and finally, I decided to use the rest for a pie. Not only do I love making pies, I was pretty excited to break in our new kitchen. It's only the second time I've made peach pie (the first time was the streusel top one that I made last summer), but I thought it would be fun to take elements from a couple recipes and put them together to make something more interesting than the standard. I also strayed from my standard all-butter crust and opted for one that was half butter and half shortening. Overall, the effect was pretty great- I made it again last week, and I think it's damn near perfect :-).
    So, what did I do different? I've already mentioned the crust, but for those of you who don't know, crusts made with lard or shortening tend to be more tender and flaky, but butter crusts (at least in my humble opinion) have better flavor. I saw a crust recipe that used half shortening and half butter, and thought that it might just be the happy medium. I also substituted honey for some of the sugar, which I think was a good move. I found a recipe that made a honey caramel sauce and added it to the peaches prior to baking. Frankly, I thought this sounded like a pain in the butt, especially when you're already going to the trouble of peeling, pitting and slices all of those peaches AND making a crust from scratch. I can't say it's not worth it because I didn't try it, but I'll just say that I have my doubts. I used cinnamon, nutmeg and cardamom, which I think goes well with the fresh peaches and honey.
   Overall, I thought it ended up being pretty delicious. The peaches were the star (as it should be), but the crust was flaky and had good flavor, and the combination of honey and spices was subtle and complimented the flavor of the fresh fruit. It was not as sweet as many pies, but the honey adds an extra dimension to the flavor, and my husband won't eat things that are super-sweet, so I consider this a win. As a side-note, make sure that you pick ripe fruit or wait for them to ripen- crunchy, tasteless fruit will absolutely ruin any dessert.


Lattice Top Peach Pie

Crust:
12 Tbs cold unsalted butter
3 cup flour
1 tsp finely ground sea salt
1 Tb sugar
1/3 cup frozen shortening
1/2 cup ice water

Filling:
3 1/2- 4 lbs fresh, ripe peaches
1/3 c sugar
1/3 c honey
1/4 c cornstarch (heaping)
1 tsp lemon juice
1 tsp lemon zest
1 tsp ginger
1 Tb cinnamon
1/4 tsp cardamom
1/4 tsp nutmeg


-To make crust, pulse the flour, sugar and salt in a food processor, then add the cold shortening and butter and pulse until it is chopped to about the size of small peas. Then, slowly add the ice water as the food processor is running until the dough comes together.
-Divide the dough in half and form each into a round disc, wrap it in plastic wrap and chill for at least 30 minutes before rolling out.
-While the crust is chilling, peel peaches and remove the pits. I like to cut them in half and start peeling from the top (where the stem comes out) after the pit is removed and then cut them lengthwise. But, you can do it however you like :-).
-Mix the prepared peaches with the sugar, honey, lemon juice and zest, cornstarch and spices and set aside.
-Roll out one of the crust disks till the diameter is about 10 inches. Place it in a pie pan and trim off the edges so that there is about 1/2 inch overhang. Cover the pan with plastic wrap and put it back in the fridge.
-Roll out the second disk to about the same size and cut it into 1/2 inch strips.
-Pour the peach mixture into the pie shell, dot the filling with small pieces of butter (~3 Tb) and weave the strips into a lattice. I like to make the lattice right on the top of the pie, because transferring the lattice can be difficult. If you've never done this before, just start at the edge of the pie and alternate between adding one vertical and one horizontal strip and place the lattice directly on the pie (see the picture below). I found a video here that shows how to make the lattice: http://www.hulu.com/watch/35675/cooking-up-a-story-how-to-make-a-pie-top-lattice.
-Trim the edges of the lattice and crimp the edges with your fingers.
-Bake the pie for 1 hr- 1 hr and 20 minutes at 375 F. The crust should be golden brown and the juices bubbling. If the crust is brown but the pie doesn't look like it's quite done, cover the top with aluminum foil so the top doesn't burn.


Monday, March 14, 2011

Gingerbread... reformatted

     When I was a kid, my mom would often make gingerbread with a warm lemon sauce for dessert. It's no coincidence that lemon and ginger are two of her favorite flavors, and she frequently uses them in dinners and dessert alike. I wanted to use up some fresh ginger I had in the fridge and thought ginger cupcakes would be delicious paired with lemon buttercream. Cupcakes are more portable than a gingerbread and so they're easier to share... and I don't need to eat a whole cake myself  ;-). And, of course, I had to share a couple with mom!
     The ginger cake recipe is from David Lebovitz (www.davidlebovitz.com) and I found it in the The Essentials New York Times Cook Book. It's a rich, flavorful cake, with lots of fresh ginger and molasses. It's also a very simple recipe and takes very little time to throw the batter together; preparing the ginger is the most time-consuming part. The buttercream was improvised, but you can take any vanilla buttercream recipe and substitute a about 2 Tbs of lemon juice for milk and add a tsp of lemon zest. It should be a little on the tart side, which contrasts nicely with the sweet cake and spicy candied ginger. You could make it without the candied ginger, but it's so pretty and tasty, why would you want to?

Ginger cake:

-1 c molasses
-1 c sugar
-1 c peanut oil (or vegetable oil)
-2 1/2 c all purpose flour
-1 tsp ground cinnamon
-1/2 tsp ground cloves
-1/2 tsp freshly ground black pepper
-1 c water
-2 tsp baking soda
-1/4 lb fresh ginger, peeled and finely chopped
-2 eggs

-Preheat the oven to 350 F.
-Mix molasses, sugar and peanut oil in a bowl and set aside
-Sift together flour, cinnamon, cloves and black pepper together and set aside.
-Bring the water to a boil in a large saucepan and add the baking soda. Then add the molasses mixture until it is well mixed and the sugar has dissolved (it will appear somewhat foamy because of the baking soda).
-Remove the saucepan from heat and combine the molasses mixture and the flour mixture (I used a mixer for this, but it can be done by hand with a whisk).

-Add the eggs and combine until the batter is smooth. (make sure the mixture has cooled a bit before you add the eggs, or you'll end up with chunks of cooked egg floating in the batter... gross).
-Pour the batter into a cupcake pan prepared with paper liners until they are about 3/4 full.
-Bake the cupcakes at 350 F for 13-15 minutes or until a toothpick comes out clean and the centers of the cake are springy.
 -Once the cupcakes are completely cooled, ice them with the buttercream frosting and sprinkle coarsely chopped over it before the frosting sets. You can pipe the icing onto the cupcake if you wish, but I like how the rough icing texture looks with the candy on top- it's up to you!

You can buy candied ginger in slices, as shown above, and chop it as coarse or fine as you like. I found this in the Asian food section of a grocery store, but sometimes it can be found with the spices.


Thursday, February 10, 2011

You make my heart flutter!

    When I decided to make these cut-out cookies, I was planning on making valentine's day EKG cookies... I was going to use 2 different patterns- atrial flutter (you make my heart flutter) and PVCs or 2nd degree heart block (you make my heart skip a beat). If you frost the cookies with royal icing, you can make a smooth surface that you can write directly on with food-safe markers. However, I don't have any of these markers and I didn't have time to search for them this week. I'll post a picture if I end up finding some before the end of the week! I have to say, though, the ones I decorated with just icing are probably prettier than the EKG patterns would have been.
    I found this cutout recipe on epicurious.com (it's from Bon Appetit magazine), and I have to say, it was delicious. I'm usually not a cut-out fan but they are so buttery and dense, they almost taste like shortbread cookies (I never said they were healthy!) and the orange and cardamom add a subtle spice. The recipe recommended decorating them with raw sugar before baking, but I chose to ice them with royal icing instead. They don't really need anything added to them, so icing isn't that important, but it does make them look prettier. I also baked them for about 5 minutes less than the recipe called for- I like my cookies more lightly baked (not brown).

Orange-Cardamom Cutouts

-1 1/2 c unsalted butter, softened
-1 cup plus 2 tablespoons sugar
-1 medium egg
-1 3/4 tsps finely grated orange peel
-1/2 teaspoon vanilla extract
-2 1/2 c flour
-1 1/4 tsps ground cardamom
-1/2 tsp salt
-parchment paper

Royal Icing

-2 Tb meringue powder
-1/4 c water
-2 c sifted powdered sugar (use less if you don't have a sifter)
-1/2 tsp vanilla

For the cookies:
-Cream butter by hand or with a mixer until fluffy, add sugar and continue to mix until it is encorporated.
-Add egg, vanilla and orange zest and continue to beat until it is well mixed.
-Mix the cardamom, flour and salt together. Add the flour to the butter mixture about 1/2 c at a time and stop mixing as soon as all of the flour mixture is incorporated.
Finished cookie dough
-Divide the dough in half, shape each half into a round disk and wrap it in plastic wrap. The dough needs to be chilled for at least 1 hour before rolling out, but you can leave it in the fridge overnight (as I did) and then set it out about 15 minutes before you want to use it.
 -Preheat the oven to 350 before you start rolling out the cookie dough.
-Roll the first disk of dough out to about 1/8 of an inch on a lightly floured surface. If it is very difficult to roll out, give it another minute or two to warm up.
-Flour your cookie cutters so they don't stick to the dough, and cut out the cookies. Place them on a cookie sheet covered with parchment paper. If your oven isn't preheated yet when you finish your first sheet, just put the whole thing in the fridge until it's ready.
-Bake the cookies for about 10-12 minutes, depending on the size of the cookies you're making. Let the cookies cool slightly on the cookie sheet before transferring to the cooling rack.
-When you're done with the first disk of dough, you can reshape the extra into a disk and pop it in the freezer for about 10 minutes before rolling it out again. Repeat with the second disk.
-Allow cookies to cool completely before icing.

For the icing:
-Mix the meringue powder and water and whisk by hand or with a mixer until it forms soft peaks (as egg whites do- to check this, lift the whisk or mixer attachment out of the bowl and see if the mixture stands up on it's own in a "peak").
-Mix in the powdered sugar until it is well mixed and the icing has the right consistency (should be a little more watery than typical buttercream icing).
-Add in vanilla, and food coloring (if you want multiple colors, divide it into small bowls and and color each individually).
-put the icing into ziploc bags and cut a small hole in the corner to pipe.
-To ice the cookies, outline the cookie first, then fill in the center and spread lightly with a butterknife or spatula. Then, shake the cookie lightly from side to side to evenly distribute it. If this work easily, the icing is probably too stiff and you need to add a little more water.
-To create patterns, you can draw lines or dots with contrasting colors and drag a toothpick or spatula through the layers to create a marbling effect.

Tuesday, January 25, 2011

Death by Chocolate Cake

     I planned to make this cake for my friend Maggie's birthday- she loves chocolate, and it doesn't get much better than this flourless cake for a chocolate lover. It is dense, rich and incidentally, one of the simplest desserts I have ever made. I served it with raspberry sorbet to balance out the devilishly rich chocolate flavor. I think it is best served at room temperature or warm, but can be stored for a couple days in the fridge. This  was adapted from a recipe in Rozanne Gold's "Cooking 1-2-3" (found on epicurious.com). It calls for semisweet chocolate (and no sugar) and didn't include the cinnamon, which I think was a nice addition. The chocolate flavor is very strong, so you don't notice it right off the bat, but it adds a subtle note to the scent and taste of the cake. Needless to say, I brought the cake to Maggie's apartment before the party and it didn't make it long enough to see her birthday :-).

Flourless chocolate cake 
-8 oz unsweetened chocolate, chopped
-1 cup sugar
-10 Tbs us butter
-1/4 tsp ground cinnamon
-6 medium eggs (or 5  large or extra large eggs)
-1/4 tsp salt

-Start by melting the butter and chocolate in a double boiler over medium heat on the stove. If you don't have a double boiler (like me!), fill a large saucepan with water and place a smaller saucepan inside (you'll melt the chocolate and butter in the smaller saucepan). The idea is that the stove will heat up the water and then heat up the chocolate more slowly and evenly, preventing it from burning. Stirring the chocolate mixture frequently will also allow the chocolate to melt properly (you don't have to stir continuously, but definitely keep a close eye on it).
The chocolate, sugar and butter melting in my make-shift double boiler
- Once the chocolate and butter has started to melt, add the sugar, and continue to stir.
- Remove the mixture from heat when completely melted and add the cinnamon.
-Whisk the eggs with the salt until it triples in size (about 8 minutes with an electric mixer).
-Fold in the chocolate mixture until it is completely incorporated. At this stage, if the chocolate it too hot, it will cook the egg before they have mixed... but if you removed it from heat when you started the eggs, you should be fine.
-Prepare a 8 1/2 inch cake pan by lining the bottom with parchment paper (cut to fit the bottom) and spraying the pan with cooking spray. They recommended a springform pan, which would certainly make it easier to remove the cake, but I didn't have one and it turned out just fine.
-Pour the batter into the cake pan and smooth to cover the bottom evenly
-Bake at 375 F for ~20 minutes- the center should still be slightly moist, and I think it would have had a slightly better texture if it had been baked less (about 18 min instead of 20).
-Allow the cake to cool about 30 minutes in the pan before removing.

Wednesday, January 5, 2011

When Life Gives You Lemons.....Make Limoncello!


  The very first kind of alcohol I tried was Limoncello- an Italian lemon liquor. I was on a trip to Italy with my mom... and I was 13. When we visited Sorrento, we had dinner at a little hole in the wall restaurant that served Limoncello between courses. They seemed surprised that I hesitated to try it. It's exactly the type of alcohol a 13-year old would like, it's smooth, sweet, fruity and it tastes more like candy than alcohol. I haven't had it for years, but I found a recipe last week when I was going through some of my mom's old magazines and I thought I'd give it a try. It's surprisingly easy, and would make a pretty gift or base for a New Year's eve cocktail! Some recipes recommend leaving the lemon peel in the vodka for up to 3 weeks, but I also found a couple recipes that only took a couple of days. Basically, the fewer lemons you use, the longer the lemon peel needs to soak in the vodka. It is best when stored in the freezer up to 3 months, and should be served very cold.

     My sister, Melissa, and I decided to make it this year as gifts. We used 80 proof vodka and the Limoncello we made froze when we stored it in the freezer (it gets diluted with a sugar syrup). However, it was delicious and thawed within a few minutes of removing it from the freezer- it never froze solid. Some recipes call for Everclear, which would solve this problem, but I don't think it was be as tasty. A higher proof vodka may be a good intermediate.

Limoncello
22 lemons (preferably organic)
1- 175 ml Smirnoff 80 proof vodka
6 cups sugar
6 cups water

-peel off the zest with a potato peeler, knife or zester. Make sure that you get a very superficial layer, as the white pith below the zest is bitter.
-add the peels to the vodka and allow to sit at room temperature for 2 days- 1 week (we waited 3 days), stirring occasionally.
The lemon peels and vodka
-after the peels been allowed to mix with the vodka for several days, make a simple syrup with the sugar and water. Start by heating the water to a boil in a medium saucepan. Add the sugar until it is all dissolved.
-Remove the sugar syrup from the heat and add to the vodka and lemon solution. Allow to sit in the fridge for a day, then strain out the peels.
-funnel the finished limoncello into glass bottles and store in the freezer. Drink once well chilled.
My parents had these pretty bottles lying around, but you can find similar ones at World Market.