
About a month ago, my friend Debbie convinced me to take a Jewish cooking class, called "Culinary Shabbat." She assured me that it wouldn't be a big deal that I wasn't Jewish, and that it would be a lot of fun to take the class together. I was a little unsure when I showed up at the Chabad House to find that the class was being taught by the orthodox rabbi's wife... I was even more unsure when the girl next to me started talking about the first time she went to Israel. That said, it was a lot of fun to learn about Jewish culture, tradition and food, even though I felt a little bit like I had to keep my Christian heritage a secret. I think the girls in the class must have thought my parents were the worst Jews in the world- they gave me a Roman name, didn't teach me any of the traditions and I'd never even had gefilte- fish before (not that I was missing out on that one)! One of the best recipes from the whole month was the challah (a soft, eggy bread).
 |
| The recipe below makes 2 huge loaves! They were about 12"x6". |
It is traditional for challah to be consumed during Shabbat dinners and holidays, but it is delicious during any time of year. A tradition that was new to me was the dividing of the challah, which is usually done by women. It involves removing a small piece of the challah dough prior to braiding it, saying a blessing and burning or throwing the small piece of dough away. The passage describing the ritual cam be found in Numbers 15:17-21. While I did this in the class, I can't bring myself to throw away any of the dough when I make it at home :).
Challah
bread dough:
2 c warm water
2 packages (or 2 Tbs) dry yeast
1 Tbs salt
1 egg, beaten
1/2 c sugar
1/2 c sugar
1/2 c olive or vegetable oil
7 c flour
egg wash:
1 egg yolk
1/4 tsp vanilla
pinch of sugar (optional)
- To make bread dough, add the yeast and a sprinkle of sugar to the warm water, and allow the yeast to activate for about 5 minutes. It will appear slightly foamy. If you don't see this, throw out the yeast and start over. Be careful not to have the water too hot, as this will kill the yeast.
-Add the sugar, salt and 1/2 of the flour (3 1/2 cups). Mix well.
-Add the egg and oil and mix thoroughly.
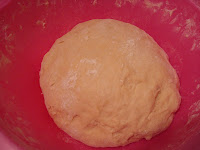
-Then slowly knead in extra flour a half cup at a time. The dough will become smooth and elastic, resembling the consistency of a stress ball. Stop adding flour at this point, even if you haven't added all 7 cups. Too much flour will make the dough (and bread) tough.
-Coat the dough with a thin layer of oil, cover with a towel and place in a warm place to allow the dough to raise.
-Allow dough to rise for 2-3 hours until it has doubled in size:
 -Divide the dough in half. Then divide each 1/2 in 4 pieces and create 3 ropes of dough. Place them parallel to one another and braid them as shown below. Start in the middle, passing the rope of dough over the first, under the second and over the third. Repeat, going left to right. When there is no dough left, fold the end underneath the loaf. Repeat with the other side.


-Add the egg and oil and mix thoroughly.
-Then slowly knead in extra flour a half cup at a time. The dough will become smooth and elastic, resembling the consistency of a stress ball. Stop adding flour at this point, even if you haven't added all 7 cups. Too much flour will make the dough (and bread) tough.
-Coat the dough with a thin layer of oil, cover with a towel and place in a warm place to allow the dough to raise.
-Allow dough to rise for 2-3 hours until it has doubled in size:


-Mix the egg glaze, and spread generously over the top of the bread. Sprinkle with cinnamon and sugar or sesame seeds, if desired.
-Bake at 375 F for approximately 30 minutes until the top is golden brown.
Hope you enjoy! My plan is to make some challah with olive oil and rosemary for post-Thanksgiving turkey sandwiches :-).

